
AEM: Create Custom Component in CQ5 with Custom Dialog
In this article we will see how to create custom component in adobe cq5 with custom dialog using CRXDE Lite, What are the Best Practices and approaches that should be followed and detailed description of each field used for creating component.
First lets understand what is a component in Adobe CQ5 or AEM:-
Components are re-usable, modular units used to achieve specific functionality that can be present on webpage. The main advantage of having a component is it is modular and isolated individual units that can be reused across the application. Below are the general properties of a component.
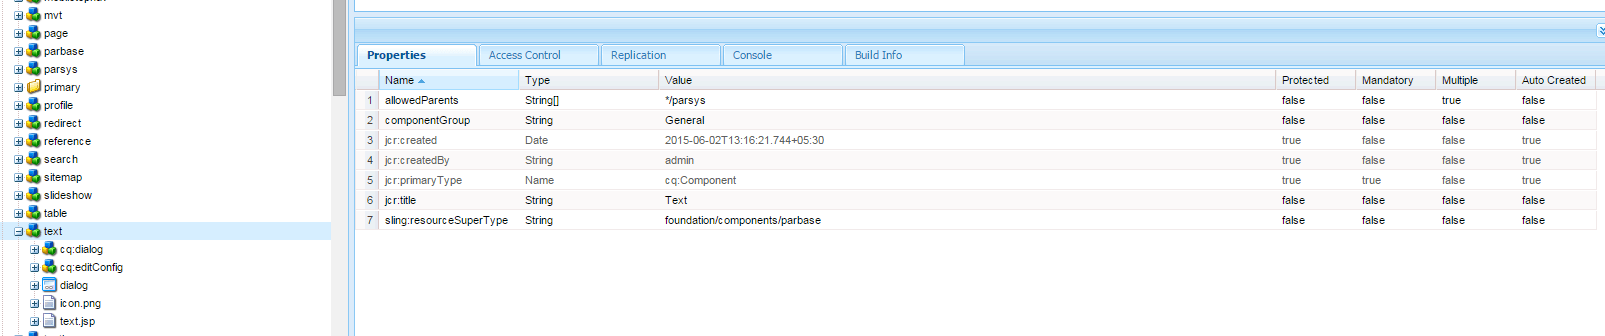
Now the next question that arises in our mind by looking at above component is what does allowedPaths property do or what do we mean by sling:superResourceType.Let’s see
- allowedParents: It specifies path of a component that is allowed to be a parent of this component.
- allowedChildren: It specifies path of a component that is allowed to be a child of this component.
- componentGroup: It specifies group under which the component can be selected in the Sidekick.
- sling:resourceSuperType: It is used to achieve inheritance in cq. When set, it inherits the specified component to this component.
There are two approaches for creating a custom component in adobe cq:-
- By copying component from libs folder and then renaming it.
- By creating a new component and then point it to libs-> foundation component.
Note:- I will suggest to use second approach as chances of manual copy pasting error are less, but for experienced developers i suggest first approach as it save lots of time while creating component. Lets see both Approaches:
Steps to create custom component in CQ5:-
Approach 1:
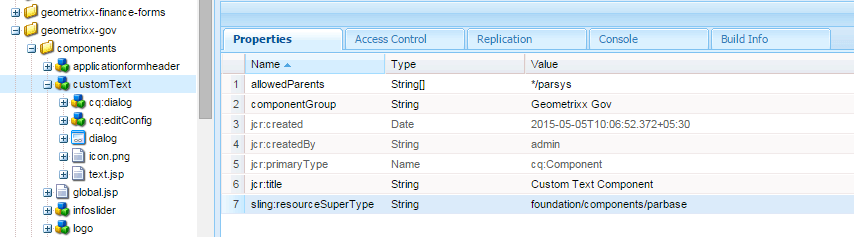
- Open CRXDE Lite , create a component folder in apps/<myProject> copy an existing component to it, such as the Text component, and rename it( Like customText in below example).For example, to customize the Text component copy:
- Text component from /libs/foundation/components/text to /apps/myProject/components/text

-
Change the jcr:title of new component (Like Custom Text Component in above example), so that we can easily distinguish it.
-
In CQ WCM , open a page in your web site in authoring mode you can see new component is available in the side kick under the component group that you have specified.
Approach 2:
Here we will create a custom component with custom dialog, which will have three fields in its dialog.
- Open CRXDE Lite , create a component folder in apps/<myProject>.
- Right click on components folder Select Create –> Create Components.

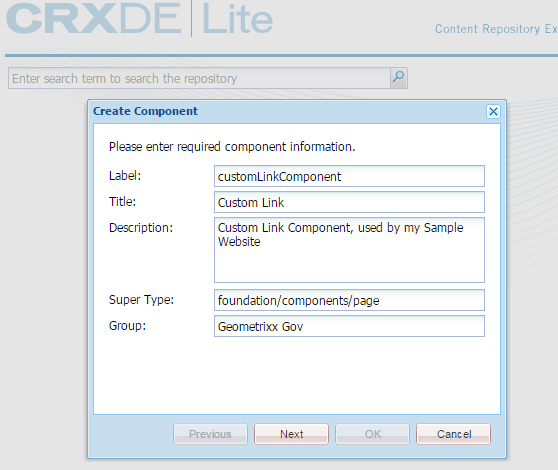
- Enter below details in the Create Component dialog :
Label : customLinkComponent
Title : Custom Link
Description : Custom Link Component, used by my Sample Website
Super Type : foundation/components/page
Group: Geometrixx Gov

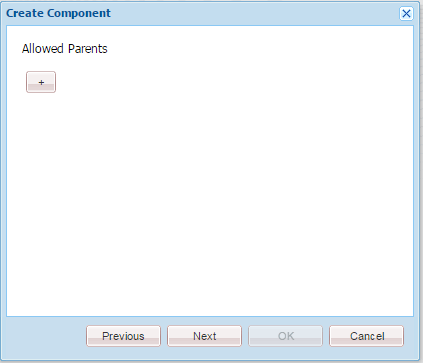
- Click Next till last screen and click OK on last Screen. These screen contains optional
properties which we have already seen above.


- Click on Save All on top left of crxde to save the changes.


Use of Advanced Component Setting during creation of component in AEM:-
- Is Container: Enable to make you component as a container like parsys. Where content author can drag and drop other components.
- No Decoration: When we hover on our component in authoring enviroment a green border comes, if we dont want the green border selection we can enable No decoration
- Cell Name: A unique div id that will be assigned to your component div.
- Dialog Path: Path of existing dialog that you want to reuse.
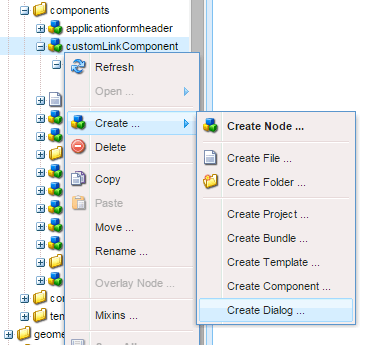
Now Lets create a Custom Dialog for the Custom Link Component
- Right Click on customLinkComponent that we have created Select Create –> Create Dialog.

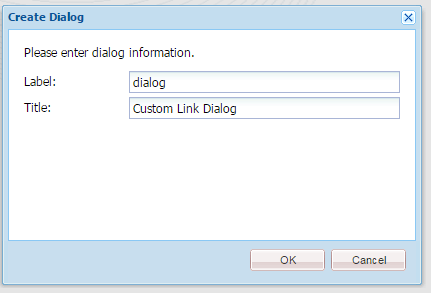
- Enter below details in the Create Dialog :
Label: dialog
Title: Custom Link Dialog

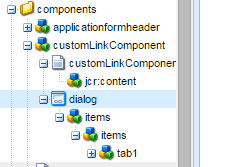
- Click OK and save all changes. You can see that your dialog structure has created.

- Provide a suitable name to tab1 value(For Ex: I have provided Custom Link Tab) and save changes.

- Right Click on tab1 or Custom Link Tab and create a node by Selecting Create –> Create Node of type cq:WidgetCollection.
- Enter below details in the Create Node:
Name: Items
Type: cq:WidgetCollection
Note:- name of cq:WidgetCollection should be Items.

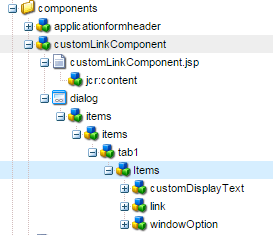
- Create new node inside the componentItems node which we have just created and enter below details. Save the changes. your dialog structure would look like below figure.
Name: displaytext
Type: cq:Widget
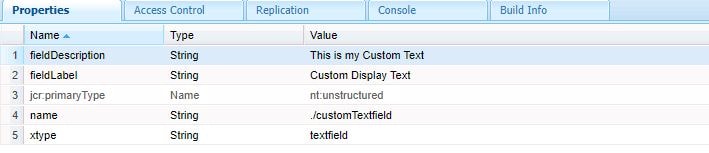
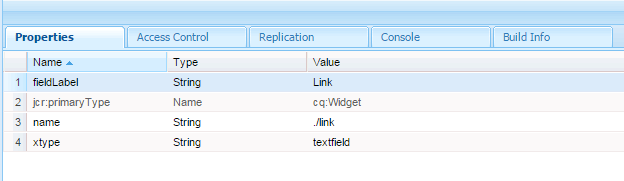
- Add following properties manually (fieldDescription, fieldLabel, name, xtype) for the customDisplayText node to configure it as a text field. see below figure for reference.

- Similarly create two more nodes on the same level of customDisplayText with properties shown below:
Name: link
Type: cq:Widget

Name: newWindow
Type: cq:Widget

- Save the changes and your final folder structure should look like:

- Open customLinkComponents.jsp and replace the existing code with below code.
<%@page language="Java"%>
<%@include file="/libs/foundation/global.jsp"%>
<cq:include script="/libs/wcm/core/components/init/init.jsp"/>
<%@page session="false" %>
<% // TODO add you code here %>
<html>
<head>
<title>Link Components</title>
</head>
<body>
<a href="#" >Click Here</a>
</body>
</html>


Integrate Custom Component with the Page
- Create a Page or use existing page and make sure you have sidekick in it which contains
your custom link component.

- Drag the custom link component to page and double click on the link to view the dialog.


Click Here to Learn How to Develop Custom Component in Touch UI
Leave a Reply