
Implement Social Plugin in CQ
Social plugins in CQ, is designed to help Social Communities and marketers to strengthen the connection between their digital properties and social networks by allowing end customers to connect and share content with their friends, family and colleagues.
Social Plugin in CQ provides below components to developers which can be dragged and dropped on the go to any page or template:
- Facebook Activity Feed
- Facebook Comments
- Facebook Facepile
- Facebook Like Button
- Facebook Live Stream
- Facebook Send Button
- Twitter Follow Button
- Twitter Search
- Twitter Share Button
Note: Social Plugins may not display properly when:
- the server is not accessible to Facebook or Twitter.
- the server is accessed using an IP address or localhost.
- the server is accessed using a port other than 80.
Configure the Link Externalizer
In CQ the Externalizer is an OSGI service that allows you to programmatically transform a resource path (e.g. /path/to/my/page) into an external and absolute URL (e.g. http://www.mycompany.com/path/to/my/page) by prefixing the path with a pre-configured DNS.
When configuring a URL, you have the option to: Leave empty to use current page. This option is especially useful when adding plugins to multiple pages or page templates. To leverage this feature, you must configure the Link Externalizer. If the Externalizer is not properly configured, the URL will not be transformed properly.
Follow these steps to configure the Externalizer:
- On the CQ welcome page, click OSGi Console.
- Log in to the OSGi console as admin.
- On the Configuration tab, locate the Day CQ Link Externalizer and open it for editing.
- In the Domains section, set the domain mapping for the author and publish servers.
For Domain Mapping follow below steps:
Define a domain mapping: a mapping consists of a unique name that can be used in the code to reference the domain, a space and the domain:
<unique-name> [scheme://]server[:port][/contextpath], where:
- scheme is usually http or https, but can also be ftp etc.; use https to enforce https links if desired; it will be used if the client code does not override the scheme when asking for externalization of a URL.
- server is the host name (can be a domain name or ip address).
- port (optional) is the port number.
- contextpath (optional) is only set if CQ is installed as a webapp under a different context path.
For example: production http://my.production.instance
The following mapping names are predefined and must always be set as CQ relies on them:
- local – the local instance
- author – the authoring system DNS
- publish – the public facing website DNS
Note: a custom configuration allows you to add a new category, such as “production”, “staging” or even external non-CQ systems such as “my-internal-webservice” and is useful to avoid hardcoding such URLs across different places in a project’s codebase.
Now Let’s understand how to implement Social Plugin in CQ
Enable the social plugin components in the sidekick
Follow these steps to add the Social Plugin components to the available list of components in the sidekick:
- Navigate to the target page.
- In the sidekick, click the option to switch to the Design mode.
- Click the Edit button to edit the design dialog of par.
- Select the Social Plugins components and click OK.

Lets implement Facebook Comment CQ5 Social Plugin.
Steps to Implement Facebook Comments Social Plugin of CQ
- Drag the Facebook Comments component from the sidekick to the target location.
- Edit the component.
- Configure the settings, as necessary.
- Click OK to preview the component.

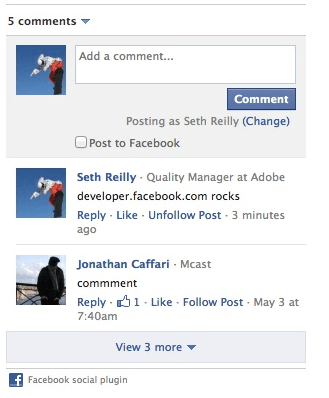
That’s it you are done.
For More Information about Facebook Comment check below Link https://developers.facebook.com/docs/reference/plugins/comments/
Steps to Implement Twitter Share Button Social Plugin of CQ
Note: The Twitter Share button will only allow users to share public facing urls. If the url is not public facing e.g. localhost, it will not be displayed.
- Drag the Twitter Share Button from the sidekick to the target location.
- Edit the component.
- Configure the settings, as necessary.
- Click OK to preview the component.


For More Information about Twitter Share Button check below Link https://twitter.com/about/resources/buttons#tweet
Leave a Reply