
Steps to Configure FileVault Tool (VLT) in CQ
The FileVault tool (VLT) is a tool developed by Adobe that maps the content of a CRX/AEM instance to your file system or we can say that it is used to map windows file system structure to CRX/AEM file system Structure.
The VLT tool has similar functions as source control system client (such as a Subversion (SVN) client), providing normal check-in, check-out and management operations, as well as configuration options for flexible representation of the project content.
NOTE: If you are using the FileVault Tool(VLT) in a CRX-only instance, the default URL for CRX is localhost:4502. Use that instead of the CQ default URL.
In AEM there are two ways of syncing content between eclipse and crx de repository:-
- Using VaultClipse Eclipse plugin
- Using command line FileVault Tool (VLT).
Configuring VaultClipse Eclipse plugin:-
Eclipse has reduced the pain of learning vlt command by providing VaultEclipse Plugin. If we directly go and install VaultClipse plugin and then eclipse 2.0 style then our vault plugin wont work because vault plugin require eclipse 2.0 UI style plugin update to display in eclipse UI. Follow below steps to configure VaultClipse plugin in Eclipse:-
Install Eclipse 2.0 Style Plugin
- Go to Help->Install New Software
- Choose “The Eclipse Project Updates – http://download.eclipse.org/eclipse/updates/4.5” in “Work with” drop down menu.
- Select “Eclipse 2.0 Style Plugin Support” under “Eclipse Tests, Examples, and Extras” and Click Next.
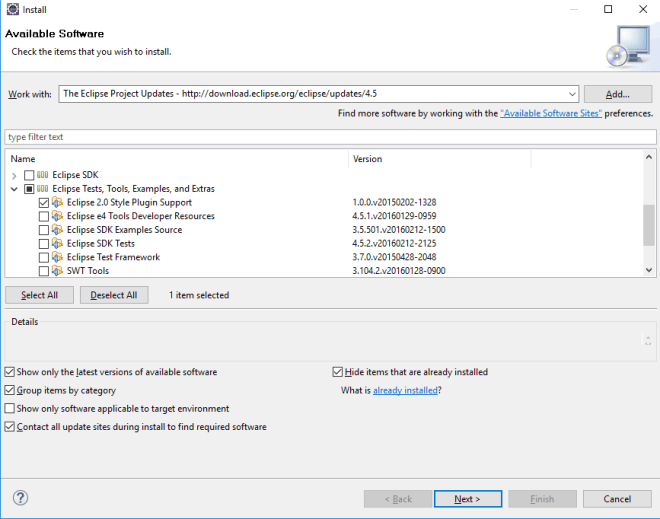
- Accept the license and click Finish.
- Restart Eclipse to complete installation.

Install VaultEclipse Plugin in Eclipse
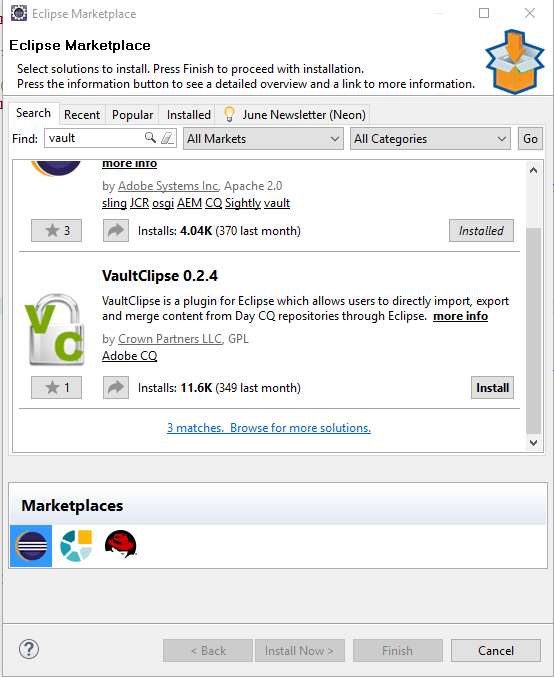
- Open Eclipse and go to eclipse MarketPlace.(Help –> Eclipse MarketPlace)
- Search for vault plugin.
- Select vaultClipse plugin and click install Now.

- Click on Confirm.

- Accept the licence and click Finish.
- Click OK on software installation warning.
- Restart the Eclipse to complete the installation process.

Configure VaultClipse Plugin:-
File vault version 3.1.16 that is shipped with AEM 6.1 is corrupted due to jackrabbit to oak upgrade. So if you are interested in using Vault plugin then copy version 2.4.34 or earlier from CQ 5.6 jar to AEM 6.1 opt folder and extract it. Update PATH environmental variable with path of vlt till bin folder.
- Go to Eclipse –> Windows –> Preferences –> Vault
- Enter Vault directory path(C:\Ankur\CQ\AEM6.1\crx-quickstart\opt\filevault\vault-cli-2.4.34).
- Change temporary directory path to your custom temp folder(Create a new folder with any name and add its path to this field).

- Click Apply and OK.

Congratulation you have successfully configured your vaultClipse plugin.
Note:- If you use vault version 3.1.16 and give its path in vault directory then you will get error “please correct the directory for vault the current directory is incorrect”.
Sync Content Between Crxde and Eclipse:
Lets test that we have configured vlt plugin correctly.
- Go to Eclipse and select and folder which has changes that are available in crxde but not in eclipse.
- Right click on folder –> Go to VaultClipse –> Select Export

- Click Finish.

- You have successfully exported your content from crxde to eclipse.


Note:- VaultClipse plugin works with respect to CRXDE, means if we need to push content from crxde to eclipse we have to export the content. Also it overrides the folder, so be careful while running this tool. If you want to merge content i will recommend creating a package from package manger and then paste it in eclipse workspace.
Configuring command line FileVault Tool (VLT):-
Getting Started with FileVault Tool (VLT)
To start using VLT, we need to perform following steps:
- Install VLT, update environment variables, and update global ignored subversion files.
- Set up the CRX/CQ repository (if you have not already done so).
- Check out the CRX/CQ repository.
- Synchronize with the repository.
- Test whether the synchronization worked.
INSTALLING THE FileVault Tool (VLT)
To use the VLT tool, first we need to install it, as t is not installed by default and is an additional tool available in the /opt folder of your CQ instance.
In addition, we need to set our system’s environment variable. Perform below steps to install FileVault Tool (VLT) :
- Copy the FileVault archive file from the cq-quickstart/opt/filevault directory of your installation. Copy either filevalut.tgz or filevault.zip, depending on your operating system.NOTE: You can also download the latest version of FileVault from Package Share.
- Extract the archive.
- Add <archive-dir>/vault-cli-<version>/bin to your environment PATH so that the command files vlt or vlt.bat are accessed as appropriate. For example, <cq-installation-dir>/crx-quickstart/opt/helpers/vault-cli-2.4.8/bin.
- Open a command line shell and execute vlt –help. Make sure it displays the following help screen:
--------------------------------------------------------------------
Usage:
vlt [options] [arg1 [arg2 [arg3] ..]]
--------------------------------------------------------------------

Global options:
-Xjcrlog Extended JcrLog options (omit argument for help)
-Xdavex Extended JCR remoting options (omit argument for
help)
--credentials The default credentials to use
--config The JcrFs config to use
-v (--verbose) verbose output
-q (--quiet) print as little as possible
--version print the version information and exit
--log-level the log4j log level
-h (--help) print this help
Commands:
export Export the Vault filesystem
import Import a Vault filesystem
checkout (co) Checkout a Vault file system
analyze Analyze packages
status (st) Print the status of working copy files and
directories.
update (up) Bring changes from the repository into the working
copy.
info Displays information about a local file.
commit (ci) Send changes from your working copy to the
repository.
revert (rev) Restore pristine working copy file (undo most local
edits).
resolved (res) Remove 'conflicted' state on working copy files or
directories.
propget (pg) Print the value of a property on files or
directories.
proplist (pl) Print the properties on files or directories.
propset (ps) Set the value of a property on files or directories.
add Put files and directories under version control.
delete (del,rm) Remove files and directories from version control.
diff (di) Display the differences between two paths.
rcp Remote copy of repository content.
console Run an interactive console
---------------------------------------------------------------------
After you have installed it you need to update global ignored subversion files. Edit your svn settings and add the following:
[miscellany]
### Set global-ignores to a set of whitespace-delimited globs
### which Subversion will ignore in its 'status' output, and
### while importing or adding files and directories.
global-ignores = .vlt
CONFIGURING THE END OF LINE CHARACTER
VLT automatically handles End Of Line (EOF) according to the following rules:
- lines of files checked out on Windows end with a CRLF
- lines of files checked out on Unices end with a LF
- lines of files commited to the repository end with a LF
To guarantee that VLT and SVN configuration match, you should set up the svn:eol-style property to native for the extension of the files stored in the repository. Edit your svn settings and add the following:
[auto-props]
*.css = svn:eol-style=native
*.cnd = svn:eol-style=native
*.java = svn:eol-style=native
*.js = svn:eol-style=native
*.json = svn:eol-style=native
*.xjson = svn:eol-style=native
*.jsp = svn:eol-style=native
*.txt = svn:eol-style=native
*.html = svn:eol-style=native
*.xml = svn:eol-style=native
*.properties = svn:eol-style=native
SETTING UP THE CRX/CQ REPOSITORY
If necessary, install CRX or install CQ and start the instance.
CHECKING OUT THE REPOSITORY
Check out the repository using the source control system. In svn, for example, type the following (substituting the URI and path with your repository):
svn co http://svn.server.com/repos/myproject
SYNCHRONIZING WITH THE REPOSITORY
You need to synchronize filevault with the repository. To do this:
In the command line, navigate to content/jcr_root.
Check out the repository by typing the following (substituting your port number for 4502 and your admin passwords):
vlt --credentials admin:admin co --force http://localhost:4502/crx
NOTE: The credentials have to be specified only once upon your initial checkout. They will then be stored in your home directory inside .vault/auth.xml.
TESTING WHETHER THE SYNCHRONIZATION WORKED
After you have checked out the repository and synchronized it, you should test to make sure everything functions properly. An easy way to do this is to edit a .jsp file and see whether your changes are reflected after committing the changes.
To test the synchronization:
- Navigate to …/jcr_content/libs/foundation/components/text.
- Edit something in text.jsp.
- See the modified files by typing vlt st
- See the changes by typing vlt diff text.jsp
- Commit the changes: vlt ci test.jsp.
- Reload a page containing a text component and see whether your changes are there.
Leave a Reply