
How to Set Up JetBrains with GitHub Copilot and AEM MCP: Complete Developer Guide
Artificial Intelligence is rapidly transforming the way developers build applications, and Adobe Experience Manager (AEM) is now embracing this evolution through Model Context Protocol (MCP) integration.
By connecting GitHub Copilot with AEM MCP servers inside JetBrains IDEs such as IntelliJ IDEA, WebStorm, or PyCharm, developers can access AEM-specific tools directly from their AI-powered coding workflow. This enables smarter development, faster content operations, and seamless interaction with AEM services without constantly switching contexts.

In this guide, you’ll Learn how to configure GitHub Copilot with AEM MCP in JetBrains IDEs and start using AEM tools directly from Copilot Chat.
Prerequisites
Before you begin, make sure you have the following:
- A supported JetBrains IDE installed (such as IntelliJ IDEA, WebStorm, or PyCharm).
- An active GitHub account with a GitHub Copilot subscription or trial access.
- Access to an Adobe Experience Manager (AEM) environment.
Follow below steps to connect GitHub Copilot in a JetBrains IDE (such as IntelliJ IDEA, WebStorm, or PyCharm) using GitHub Copilot plugin.
Step 1: Install GitHub Copilot in JetBrains
Open the Plugins Marketplace
- Launch your JetBrains IDE (IntelliJ IDEA).
- Navigate to:- Settings → Plugins

- Search for GitHub Copilot.
- Select Github Copilot Plugin under Marketplace tab and Click Install.
- Restart the IDE when prompted.

Sign In to GitHub copilot
After restarting your IDE , follow below steps to authenticate your connection to Github Copilot
Open: Tools → GitHub Copilot → Login

Complete the authentication process in your browser.
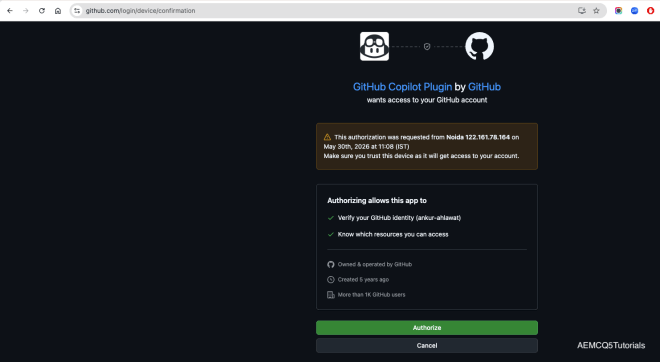
First you will be prompted to Authorise your device.
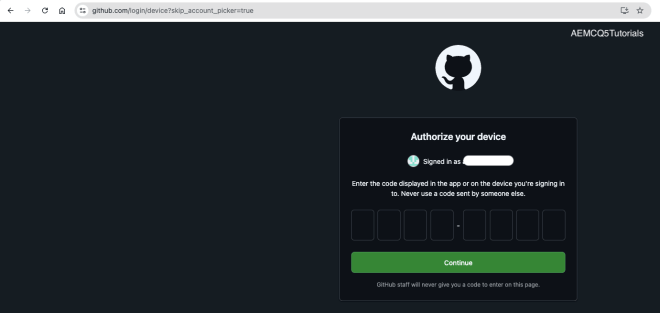
Then you need to enter the code that you will see after clicking on Login to Github. Make sure you copy that code and keep it handy.
Enter the code on the screen and that’s it. You are all set to use Github Copilot.

Return to the IDE and verify the connection. You should now see Copilot suggestions appearing while coding.
Step 2: Verify GitHub Copilot Functionality
Create a simple test file like SimpleServlet.java and start typing a function:
GitHub Copilot should automatically generate suggestions based on the context.

You can use:
- Tab to accept suggestions
- Alt + ] for next suggestion
- Alt + [ for previous suggestion
If suggestions are not appearing, verify:
- GitHub authentication
- Active subscription
- Internet connectivity
- Plugin installation status
Verify GitHub Copilot Chat Support
Before proceeding, ensure that your JetBrains IDE supports GitHub Copilot Chat. If you do not see the GitHub Copilot Chat option after installing the plugin, your IDE version may be outdated.
I encountered this issue while using IntelliJ IDEA 2021.3.3 (Community Edition), where the latest AI features were not available. Upgrading to a newer IntelliJ IDEA release resolved the problem.
To use the latest GitHub Copilot and AI-powered development features, install the most recent version of IntelliJ IDEA from the JetBrains website. In my case, upgrading to IntelliJ IDEA 2025.2.6.2 (Apple Silicon) using the ideaIC-2025.2.6.2-aarch64.dmg installer enabled full GitHub Copilot Chat functionality.
Tip: Always use the latest stable version of your JetBrains IDE to ensure compatibility with GitHub Copilot, MCP integrations, and other AI-assisted development tools.
Configure MCP Settings
As we have now successfully, installed Github Copilot. Let’s configure the AEM MCP server in our IDE. Click the settings icon in the Copilot Chat panel to open the MCP configuration.
Settings → Tools → GitHub Copilot → Model Context Protocol (MCP) → Click: Configure

JetBrains will open the MCP configuration mcp.json file. Let’s Add one or more AEM MCP server URLs to the mcp.json file. For example:-
- Let’s add one server for Adobe MCP
- One for local development with AI Tools
{
    "servers": {
      "aem-cloud-mcp": {
        "url": "https://mcp.adobeaemcloud.com/adobe/mcp/content"
      },
      "aem-local-server": {
        "url": "http://localhost:4502/bin/mcp",
        "requestInit": {
          "headers": {
            "Authorization": "Basic YWRtaW46YWRtaW4="
          }
        }
      }
    }
}
Because Intellij automatically saves the file, that’s why as soon as you add the mcp details. GitHub Copilot detects the new server configuration automatically and a Start action appears near the configured server.

Click the Start action and When prompted, sign in with your Adobe ID to complete the authentication flow and grant the required permissions.
After successful authentication, the MCP connection becomes active and Copilot will initialize the connection and begin discovering available tools from the AEM MCP server.
Once connected open GitHub Copilot Chat → Click the Tools indicator → Review the discovered AEM tools.
Depending on your environment and permissions, multiple AEM-specific capabilities may become available. You can also enable or disable individual tools based on your workflow requirements.

In order to enable MCP support in your local AEM SDK instance, we need MCP content package to be installed on local AEM server.
- Download the MCP content package from the Adobe Software Distribution Portal.
- Access AEM Package Manager at:
http://localhost:4502/crx/packmgr
- Upload and install the following package:
com.adobe.aem:com.adobe.aem.mcp-server-contribs-content
Once installed, the MCP server endpoints become available for AI clients such as GitHub Copilot.

Compatibility: The AEM Quickstart MCP Server has been validated with AEM SDK version 2026.2.24678.20260226T154829Z-260200 and later releases. Make sure you are using latest AEM Cloud SDK from Adobe Software Distribution Portal.
Ensure that your local AEM SDK is running on Java 21, as the AEM Quickstart MCP Server requires Java 21 compatibility.
Available MCP Tools
After installation, the following diagnostic and monitoring tools become available through the MCP server:
| Tool | Description |
|---|---|
| aem-logs | Retrieves AEM and OSGi log entries with support for filtering by log level, regular expression patterns, and entry count. |
| diagnose-osgi-bundle | Helps identify why an OSGi bundle or Declarative Services (DS) component is not starting by reporting missing dependencies, unsatisfied references, and configuration issues. |
| recent-requests | Displays recent HTTP requests along with Sling’s internal request-processing details, including resource resolution, script resolution, and filter-chain execution. Results can be filtered using path-based regular expressions. |
These tools provide valuable insights into your local AEM environment and allow AI assistants to perform deeper diagnostics, making troubleshooting and development significantly more efficient.
As MCP adoption continues to grow, organizations using AEM can unlock even greater value from AI-powered development tools by providing richer project context and domain-specific knowledge to their coding assistants.
Have you integrated GitHub Copilot and MCP into your AEM development workflow? Share your experience and favorite use cases in the comments below.
Leave a Reply