
Building a Simple AEM Assets View UI Extension with Adobe App Builder: A Generic POC

If you are learning Adobe App Builder and AEM Assets View UI extensions, or planning to build your first app then this tutorial is for you.
It is a generic proof of concept designed to show the real end-to-end flow: create the App Builder project, configure it in Adobe Developer Console, decide whether OAuth is needed, deploy it, and test it in AEM Assets View.
We will keep the UI intentionally simple: one custom panel and one button named Test Extension. When the user clicks the button, the extension shows a toast message: UI Extension is working successfully. This will help you in understanding end to end integration flow and how to deploy your custom code via App Builder.
Why This POC Matters
UI extensions are useful because they let you add a focused custom interface inside AEM either it is Assets View, Sites or any other ares without modifying the host product itself.
- Adobe App Builder gives you the runtime and deployment model.
- Adobe Developer Console gives you the project and credential model.
- AEM Assets View is the host UI where the extension is loaded and tested.
For this POC, the extension does not call a real backend service or Adobe API. It intentionally stays very small so the learning goal remains clear: project creation, configuration, OAuth awareness, build, deployment, and validation in AEM Assets View.
The Real Developer Workflow
Before writing code, it is important to be realistic about access and permissions. In Adobe’s extension model, the developer console project is not just a folder. It is the environment where you manage org, project, workspace, deployment, and credentials.
Access requirement: To create a project in Adobe Developer Console and deploy an App Builder app, you typically need System Administrator access or equivalent project-management permissions in the target Adobe org.
If your user does not have the right org permissions, the flow stops before the app is created. That is not a code issue. It is an access issue. For a real developer setup, this is the first thing to validate before you begin building.
What We Are Building

How to read this architecture: The developer creates the project, App Builder manages the app lifecycle, Developer Console manages the project and credentials, OAuth is used when Adobe tokens are required, and AEM Assets View loads the extension for validation.
Prerequisites
- System Administrator access or equivalent project-management access in Adobe Developer Console.
- Access to AEM Assets View in an environment that supports UI extensibility.
- Node.js and npm.
- Adobe I/O CLI (AIO CLI).
- Permission to work in the target Adobe org and workspace.
- Access to a workspace such as Dev or Stage or a dev workspace for validation.
Important: Adobe docs state that UI extensibility is supported in Assets Ultimate. Also, always use the current Adobe-supported version of your local tools instead of hard-coding versions from older examples.
Useful AIO CLI Commands
These are the commands you will use repeatedly during real App Builder work. They are small, but they save time when you are switching orgs, validating the workspace, or troubleshooting a deployment.
aio login
aio logout --force
aio console org select
aio console project select
aio console workspace select
aio where
aio app build
aio app run
aio app dev
aio app deploy
aio app undeploy
Typical flow for a developer working in a new environment:
aio logout --force
aio login
aio console org select
aio console project select
aio console workspace select
aio where
npm install
aio app build
aio app dev
These commands are helpful for checking your Adobe context before you push code or try to validate the extension in AEM Assets View. If the org, project, or workspace is wrong, the deployment flow will fail even when the code itself is correct.
Step 1 — Create the App Builder Project in Adobe Developer Console
Let’s start first with creating our project. In Adobe Developer Console, go to Create new project and choose Project from template, then select App Builder. This gives you the application project that will host the AEM Assets View extension.
Once the project is created, Adobe Developer Console creates default workspaces. In most cases, the project includes Stage and Production workspaces. Before deployment, confirm the correct org and workspace so the project is not being pushed into the wrong environment.
What you should check at this step:
- Correct Adobe org selected
- Correct project selected
- Correct workspace selected
- Developer has required permissions to create and deploy the project
Why this matters: if the wrong org or workspace is selected, the extension may build locally but fail at deployment or testing. A clean project creation step saves a lot of wasted time later.
Step 2 — Sign In from the CLI and Validate the Developer Context
After the project is created, start from the command line. Use the Adobe I/O CLI to sign in and verify the active org/project/workspace context.
aio login
aio console org select
aio console project select
aio console workspace select
Typical output is not a deployment result. It is a validation step. The purpose is to confirm that the CLI is pointed to the same org/project/workspace that you created in Adobe Developer Console.
Developer reminder: If you can sign in but cannot select the right project or workspace, you probably do not have the correct Adobe org permissions. That is a setup issue, not a code issue.
Step 3 — Configure the OAuth Service
IMPORTANT: OAuth Configuration
Use OAuth in Adobe Developer Console when your app needs Adobe access tokens for protected Adobe APIs.
This is a critical separation between “UI only” and “UI + authenticated API access.” A dummy button does not need OAuth. But if the extension later needs to call a protected Adobe API, you must configure the OAuth service in Developer Console.
Why this matters:
- OAuth handles authentication and authorization.
- Access tokens are issued only after the app is configured correctly.
- Scopes define what the app is allowed to request.
- Secrets and tokens must not be hard-coded in browser UI code.
| Item | Purpose |
|---|---|
| OAuth Service | Authentication and authorization flow |
| Client/application configuration | Identifies the application to Adobe IMS |
| Access token | Used for authorized Adobe API access |
| Scopes | Define permitted access |
Important distinction: this dummy-button POC does not require OAuth to work. OAuth is only required when the app needs to call authenticated Adobe APIs or use Adobe access tokens.
Scope caution: scopes are API-specific. If it is not explicitly supported in the Adobe documentation, do not assume it is supported. For this dummy-button POC, none are required because we are not calling a protected Adobe API.
Step 4 — Create the Simple UI
At this point, we are ready to generate the extension project and build the simple UI. Adobe’s AEM Assets View extension guides show that the extension uses a host/guest model:
- Host application: AEM Assets View
- Guest application: the extension UI
register(): announces the extension to the hostattach(): connects the custom panel to host APIs
For this demo, the extension should expose a custom panel with a single button labeled Test Extension.
Minimal registration example
import React from 'react'
import { register } from '@adobe/uix-guest'

export default function ExtensionRegistration() {
  React.useEffect(() => {
    register({
      id: 'generic-poc-extension',
      methods: {
        detailSidePanel: {
          async getPanels() {
            return [{
              id: 'generic-poc-panel',
              tooltip: 'Generic POC',
              title: 'Generic POC',
              icon: 'Extension',
              contentUrl: '/#generic-poc-panel'
            }]
          }
        }
      }
    })
  }, [])

  return null
}
Minimal panel example
import React from 'react'
import { attach } from '@adobe/uix-guest'
import { Button, Provider, defaultTheme } from '@adobe/react-spectrum'

export default function GenericPocPanel() {
  const [guestConnection, setGuestConnection] = React.useState(null)

  React.useEffect(() => {
    attach({ id: 'generic-poc-extension' }).then(setGuestConnection)
  }, [])

  const onPress = () => {
    guestConnection?.host?.toast?.display({
      variant: 'positive',
      message: 'UI Extension is working successfully.'
    })
  }

  return (
    <Provider theme={defaultTheme}>
      <Button variant="primary" onPress={onPress}>Test Extension</Button>
    </Provider>
  )
}
Step 5 — Build the Extension
Once the project and UI scaffold are ready, the next step is to build the extension. Adobe’s recommended flow is to use the project tooling to install dependencies and build the app in a consistent order.
aio app buildTypical result: dependencies are installed and the build completes without errors. This is the point where the project proves it is structurally valid before you attempt UI testing in AEM Assets View.
Step 6 — Run Locally
Now start the local dev server and verify that the extension is reachable in the browser.
aio app runExample result:
To view your local application:
  - https://localhost:9080

To view your deployed application in the Experience Cloud shell:
  - https://experience.adobe.com/?devMode=true#/custom-apps/?localDevUrl=https://localhost:9080
You may need to accept the local self-signed certificate once in the browser. This is normal for local HTTPS development. Without accepting the certificate, the browser can block the extension from loading even though the server is running.
Step 7 — Load the Extension in AEM Assets View
Use the Adobe-documented `devMode=true` and `ext=` query parameters to load the local extension into AEM Assets View.
https://experience.adobe.com/?devMode=true&ext=https://localhost:9080devMode=trueallows local extension loading.ext=<extension endpoint>points to the extension front end.- You can use multiple
extparameters for testing several extensions simultaneously.
Adobe also documents below extension-point-specific syntax, sometimes ext=<endpoint> does not resolve in such cases you can try below extension such as:
ext.aem%2fassets%2fassetsview%2f1=https://localhost:9080This is the mechanism that proves the extension is actually being consumed by AEM Assets View, not just built locally.
Step 8 — Validate the POC in a Development Workspace
This is the point where the project starts behaving like a real developer deliverable. The goal is not just to run the app locally, but to confirm that the same project can be pushed into an Adobe-managed development workspace and validated there.
When you have the correct Adobe org permissions and a valid development workspace, the sequence is:
- Confirm the correct org/workspace
- Run the application build
- Deploy the project to the target dev workspace
- Open AEM Assets View with the deployed extension URL
- Verify the custom panel loads and the button works
aio app deployIn a real org, this is where you verify the same extension works after a deployment rather than only in local development mode. For a successful validation, the developer should confirm:
After deployment, Adobe Developer Console also shows the CDN root URL registered for the workspace. This is useful because it tells you the hosted location from which the extension static assets are being served.
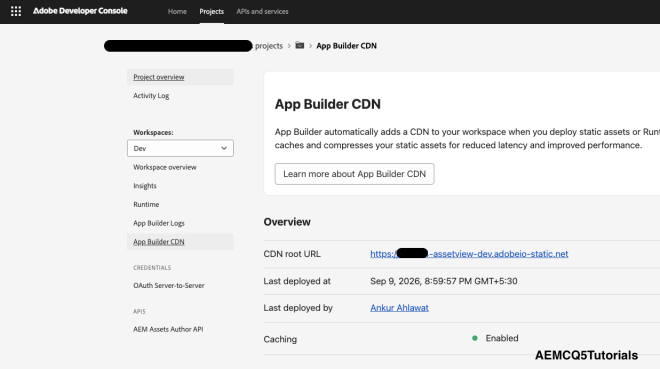
In this Developer Console view, the CDN root URL is the registered deployment URL for the extension. You can use the deployed extension URL derived from this workspace deployment when validating the extension in AEM Assets View.
- Deployment completed without errors
- Extension URL was generated
- Host app loaded the extension
Test Extensionbutton appeared- Toast message appeared after click
Required environment reality: A developer can only complete this validation when they have the correct Adobe org access and a valid dev workspace. Without System Administrator or equivalent permissions, the deployment and verification step cannot be completed.
Step 9 — Validate the Button and Toast in the Host UI

This is the sanity check everyone wants to see in a real developer workflow:
- Open AEM Assets View.
- Load the extension with the correct query parameters.
- Verify the custom panel or button appears.
- Click
Test Extension. - Verify the toast
UI Extension is working successfully.. - Review browser console for runtime issues.
If this works, it means the extension is registered correctly, the panel renders, and the host-guest communication path is working.
Troubleshooting
| Issue | What to do |
|---|---|
| Project not visible in Developer Console | Verify Adobe org and permissions. System Administrator access is usually required. |
| Build fails | Confirm dependencies are installed and the correct workspace is selected. |
| Extension does not load | Check the local or deployed URL and the ext= parameter or ext.aem%2fassets%2fassetsview%2f1 |
| Certificate warning | Open the local HTTPS URL and accept the self-signed certificate. |
Missing devMode=true | Add the parameter and reload AEM Assets View. |
| OAuth not configured | Only add OAuth when protected Adobe APIs are required. |
| Token errors | Verify the correct credential type, redirect configuration, and scopes. |
Conclusion
This is the basic developer workflow for a simple AEM Assets View UI extension: create the project, validate access, configure the app, understand OAuth placement, build locally, test in AEM Assets View, and then push the project to a dev environment for validation. The dummy-button example is intentionally simple, but it gives a reliable foundation for the full extension lifecycle.
If you want to move beyond the POC, the next step is to add one small real feature at a time and validate it against the same deployment and testing routine. That is how a simple proof of concept becomes a production workflow without introducing unnecessary complexity too early.
References
- Adobe AEM Assets View Extension Development: https://developer.adobe.com/uix/docs/services/aem-assets-view/extension-development/
- Adobe AEM Assets View Debug / Load UI Extension: https://developer.adobe.com/uix/docs/services/aem-assets-view/debug/#load-ui-extension
- Adobe Developer Console User Authentication (IMS Scopes): https://developer.adobe.com/developer-console/docs/guides/authentication/UserAuthentication/ims